Use Vault with HA mode


このブログの SSL/TLS 証明書を Vault で管理しようと考えています。
現在サーバーは 3 台でクラスターを組んでおり、 Nomad と Consul でアプリケーションを管理しています。ここに Vault を追加しました。
Vault の HA 構成
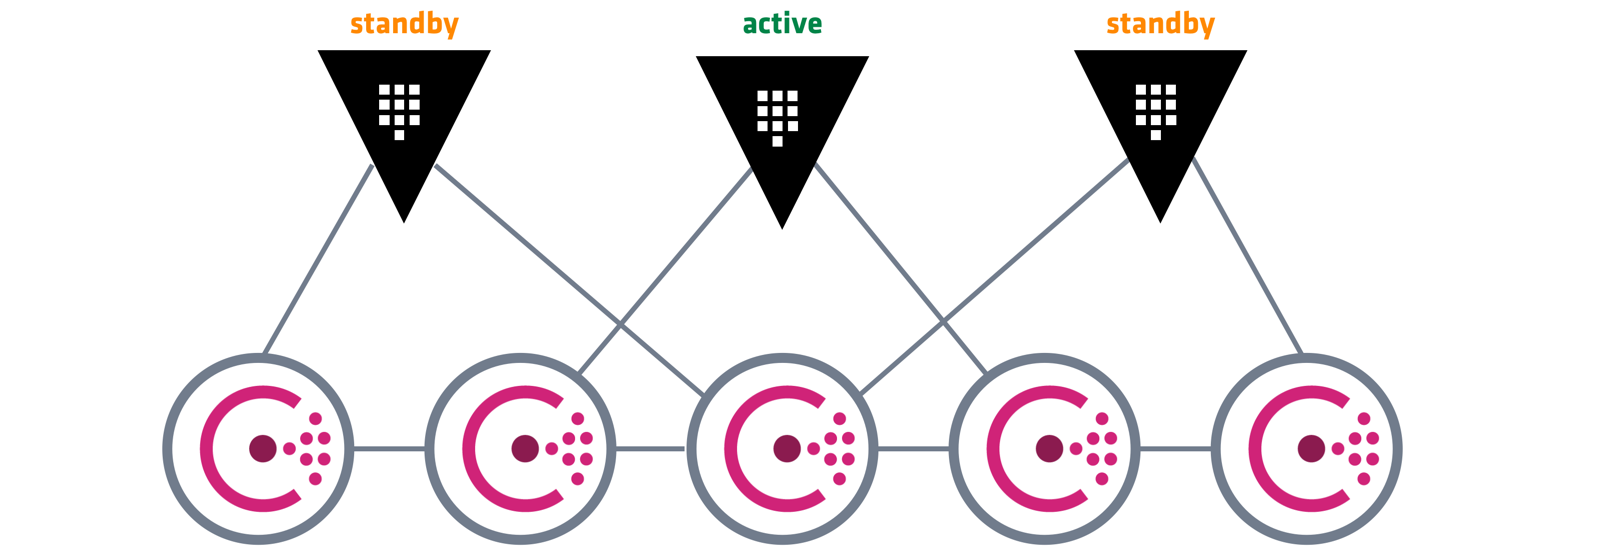
1 台で Vault を運用するのは心許ないので、 3 台でクラスターを組み可用性を高めてみます。Vault は high availability (HA) モードで動かすことができます。HA モードでの Vault はアクティブとスタンバイの状態があります。Vault クラスターは 1 台のアクティブノードと複数のスタンバイモードから構成されます。それぞれの役割は以下です。
- アクティブノード: 読み取りと書き取りの全てを処理する。
- スタンバイノード: リクエストをアクティブノードにリダイレクトする。
- バージョン 0.11 以降の Vault Enterprise ではスタンバイノードに読み取り専用の機能を有効にできるみたいです (パフォーマンススタンバイノード機能)。
Vault High Availability with Consul | Vault - HashiCorp Learn
HA モードを有効にするのは Consul を使用している環境であればすごく簡単で、ストレージバックエンドに Consul を指定すれば使えるようになります。
storage "consul" {
  address = "127.0.0.1:8500"
  path    = "vault/"
}
クラスターの内の 1 台の Vault の設定全体の例は以下。本来 TLS は有効にすべきですが簡単のため一旦無効にしています。クラスター内で通信を行うので他のサーバーが接続できるように自身のプライベート IP アドレスを設定します。
listener "tcp" {
  address          = "0.0.0.0:8200"
  cluster_address  = "10.130.111.4:8201"
  tls_disable      = "true"
}

storage "consul" {
  address = "127.0.0.1:8500"
  path    = "vault/"
}

ui = true

api_addr = "http://10.130.111.4:8200"
cluster_addr = "http://10.130.111.4:8201"
Vault の初期化はクラスター内の 1 台のみで行います。
$ export VAULT_ADDR=http://127.0.0.1:8200

$ vault operator init
unseal はクラスター内の全ての Vault サーバーで行う必要があります。
$ export VAULT_ADDR=http://127.0.0.1:8200

$ vault operator unseal xxxxxxxx
...
unseal を一台一台手で行うのは手間ですが、自動化ツールで unseal を行うのは困難なため、現状手動で行うことが推奨されているみたいです。ドキュメントの通り Consul 等を使用して複数のサーバーにまとめて行うのが良さそう。将来的にこの辺をうまくやる機能が追加されるっぽい。
Note: Unsealing makes the process of automating a Vault install difficult. Automated tools can easily install, configure, and start Vault, but unsealing it is a very manual process. We have plans in the future to make it easier. For the time being, the best method is to manually unseal multiple Vault servers in HA mode. Use a tool such as Consul to make sure you only query Vault servers that are unsealed.
Seal/Unseal | Vault by Hashicorp
あと Vault を再起動すると seal されてしまい unseal するのが面倒なのでなるべく reload を使う。
Once a Vault is unsealed, it remains unsealed until one of two things > happens:
- It is resealed via the API (see below).
- The server is restarted.
Seal/Unseal | Vault by Hashicorp
動作確認
全てのサーバーで unseal が完了後、1 台のサーバーで Vault の KVS にデータを入れてみます。
[centos@server-1 ~]$ export VAULT_ADDR=http://127.0.0.1:8200
[centos@server-1 ~]$ vault login <initial root token>

[centos@server-1 ~]$ vault secrets enable -path=secret/ kv
Success! Enabled the kv secrets engine at: secret/

[centos@server-1 ~]$ vault kv put secret/hello foo=world
Success! Data written to: secret/hello

[centos@server-1 ~]$ vault kv get secret/hello
=== Data ===
Key    Value
---    -----
foo    world
別のサーバーで PUT したデータを GET できるか確認します。
[centos@server-2 ~]$ export VAULT_ADDR=http://127.0.0.1:8200
[centos@server-2 ~]$ vault login <initial root token>

[centos@server-2 ~]$ vault kv get secret/hello
=== Data ===
Key    Value
---    -----
foo    world
GET できました!✨
これでノードに関係なく共通の KVS を参照することができるようになりました。
Bolt の構成
Vault のインストール、設定を Bolt で自動化しています。
Boltdir/site-modules/vault/
├── files
│   └── vault.service
├── plans
│   └── init.pp
└── templates
    └── vault.hcl.epp
こんな感じで plan を書いています。
plan vault (
  TargetSpec $targets
) {
  $vault_version       = '1.4.0-rc1'
  $vault_download_link = "https://releases.hashicorp.com/vault/${vault_version}/vault_${vault_version}_linux_amd64.zip"

  # Install vault.
  run_command(
    "curl -s $vault_download_link -o /tmp/vault.zip && \
    unzip -o /tmp/vault.zip -d /usr/local/bin && \
    mkdir -p /etc/vault.d && \
    mkdir -p /opt/vault",
    $targets
  )

  ## Setup vault.
  run_command("setcap cap_ipc_lock=+ep /usr/local/bin/vault", $targets)

  $check_vault_user  = run_command("id vault", $targets, _catch_errors => true)
  $no_vault_user     = $check_vault_user.filter |$r| { $r[exit_code] == 1 }
  $subset_vault_user = $no_vault_user.map |$r| { $r.target }
  run_command("useradd --system --home /etc/vault.d --shell /bin/false vault", $subset_vault_user)

  upload_file(
    'vault/vault.service',
    '/etc/systemd/system/vault.service',
    $targets
  )

  $targets.apply_prep
  apply($targets) {
    file { '/etc/vault.d/vault.hcl':
      ensure  => file,
      content => epp('vault/vault.hcl.epp', {
        'private_addr' => $ipaddress_eth1
      })
    }
  }

  run_command(
    'systemctl daemon-reload',
    $targets
  )
}
使用している vault.service ファイルは以下。
[Unit]
Description="HashiCorp Vault - A tool for managing secrets"
Documentation=https://www.vaultproject.io/docs/
Requires=network-online.target
After=network-online.target
ConditionFileNotEmpty=/etc/vault.d/vault.hcl
StartLimitIntervalSec=60
StartLimitBurst=3

[Service]
User=vault
Group=vault
ProtectSystem=full
ProtectHome=read-only
PrivateTmp=yes
PrivateDevices=yes
SecureBits=keep-caps
AmbientCapabilities=CAP_IPC_LOCK
Capabilities=CAP_IPC_LOCK+ep
CapabilityBoundingSet=CAP_SYSLOG CAP_IPC_LOCK
NoNewPrivileges=yes
ExecStart=/usr/local/bin/vault server -config=/etc/vault.d/vault.hcl
ExecReload=/bin/kill --signal HUP $MAINPID
KillMode=process
KillSignal=SIGINT
Restart=on-failure
RestartSec=5
TimeoutStopSec=30
StartLimitInterval=60
StartLimitIntervalSec=60
StartLimitBurst=3
LimitNOFILE=65536
LimitMEMLOCK=infinity

[Install]
WantedBy=multi-user.target
vault.hcl のテンプレートは以下。
<%- | String $private_addr
| -%>
listener "tcp" {
  address          = "0.0.0.0:8200"
  cluster_address  = "<%= $private_addr %>:8201"
  tls_disable      = "true"
}

storage "consul" {
  address = "127.0.0.1:8500"
  path    = "vault/"
}

ui = true

api_addr = "http://<%= $private_addr %>:8200"
cluster_addr = "http://<%= $private_addr %>:8201"
Bolt は Puppet の機能も使えるので、Puppet の Facts (サーバーの情報を取得する機能) を使って設定ファイル内に使うプライベート IP アドレスを取得しています。plan の $ipaddress_eth1 が eth1 に割り当てられている IP アドレスを取得する Facts です。
感想
今後は
- Nomad と Vault の連携
- Nomad ジョブで証明書を取得、Vault へ保管
- Vault で保管した証明書を Nginx で使う
を試していく!💪